> ## Documentation Index
> Fetch the complete documentation index at: https://cometchat-22654f5b-docs-audit-content-webhooks.mintlify.site/llms.txt
> Use this file to discover all available pages before exploring further.
# UI Kit Builder Integration
> Integrate CometChat UI Kit Builder into Flutter apps with exported assets, app keys, dependencies, and platform setup.
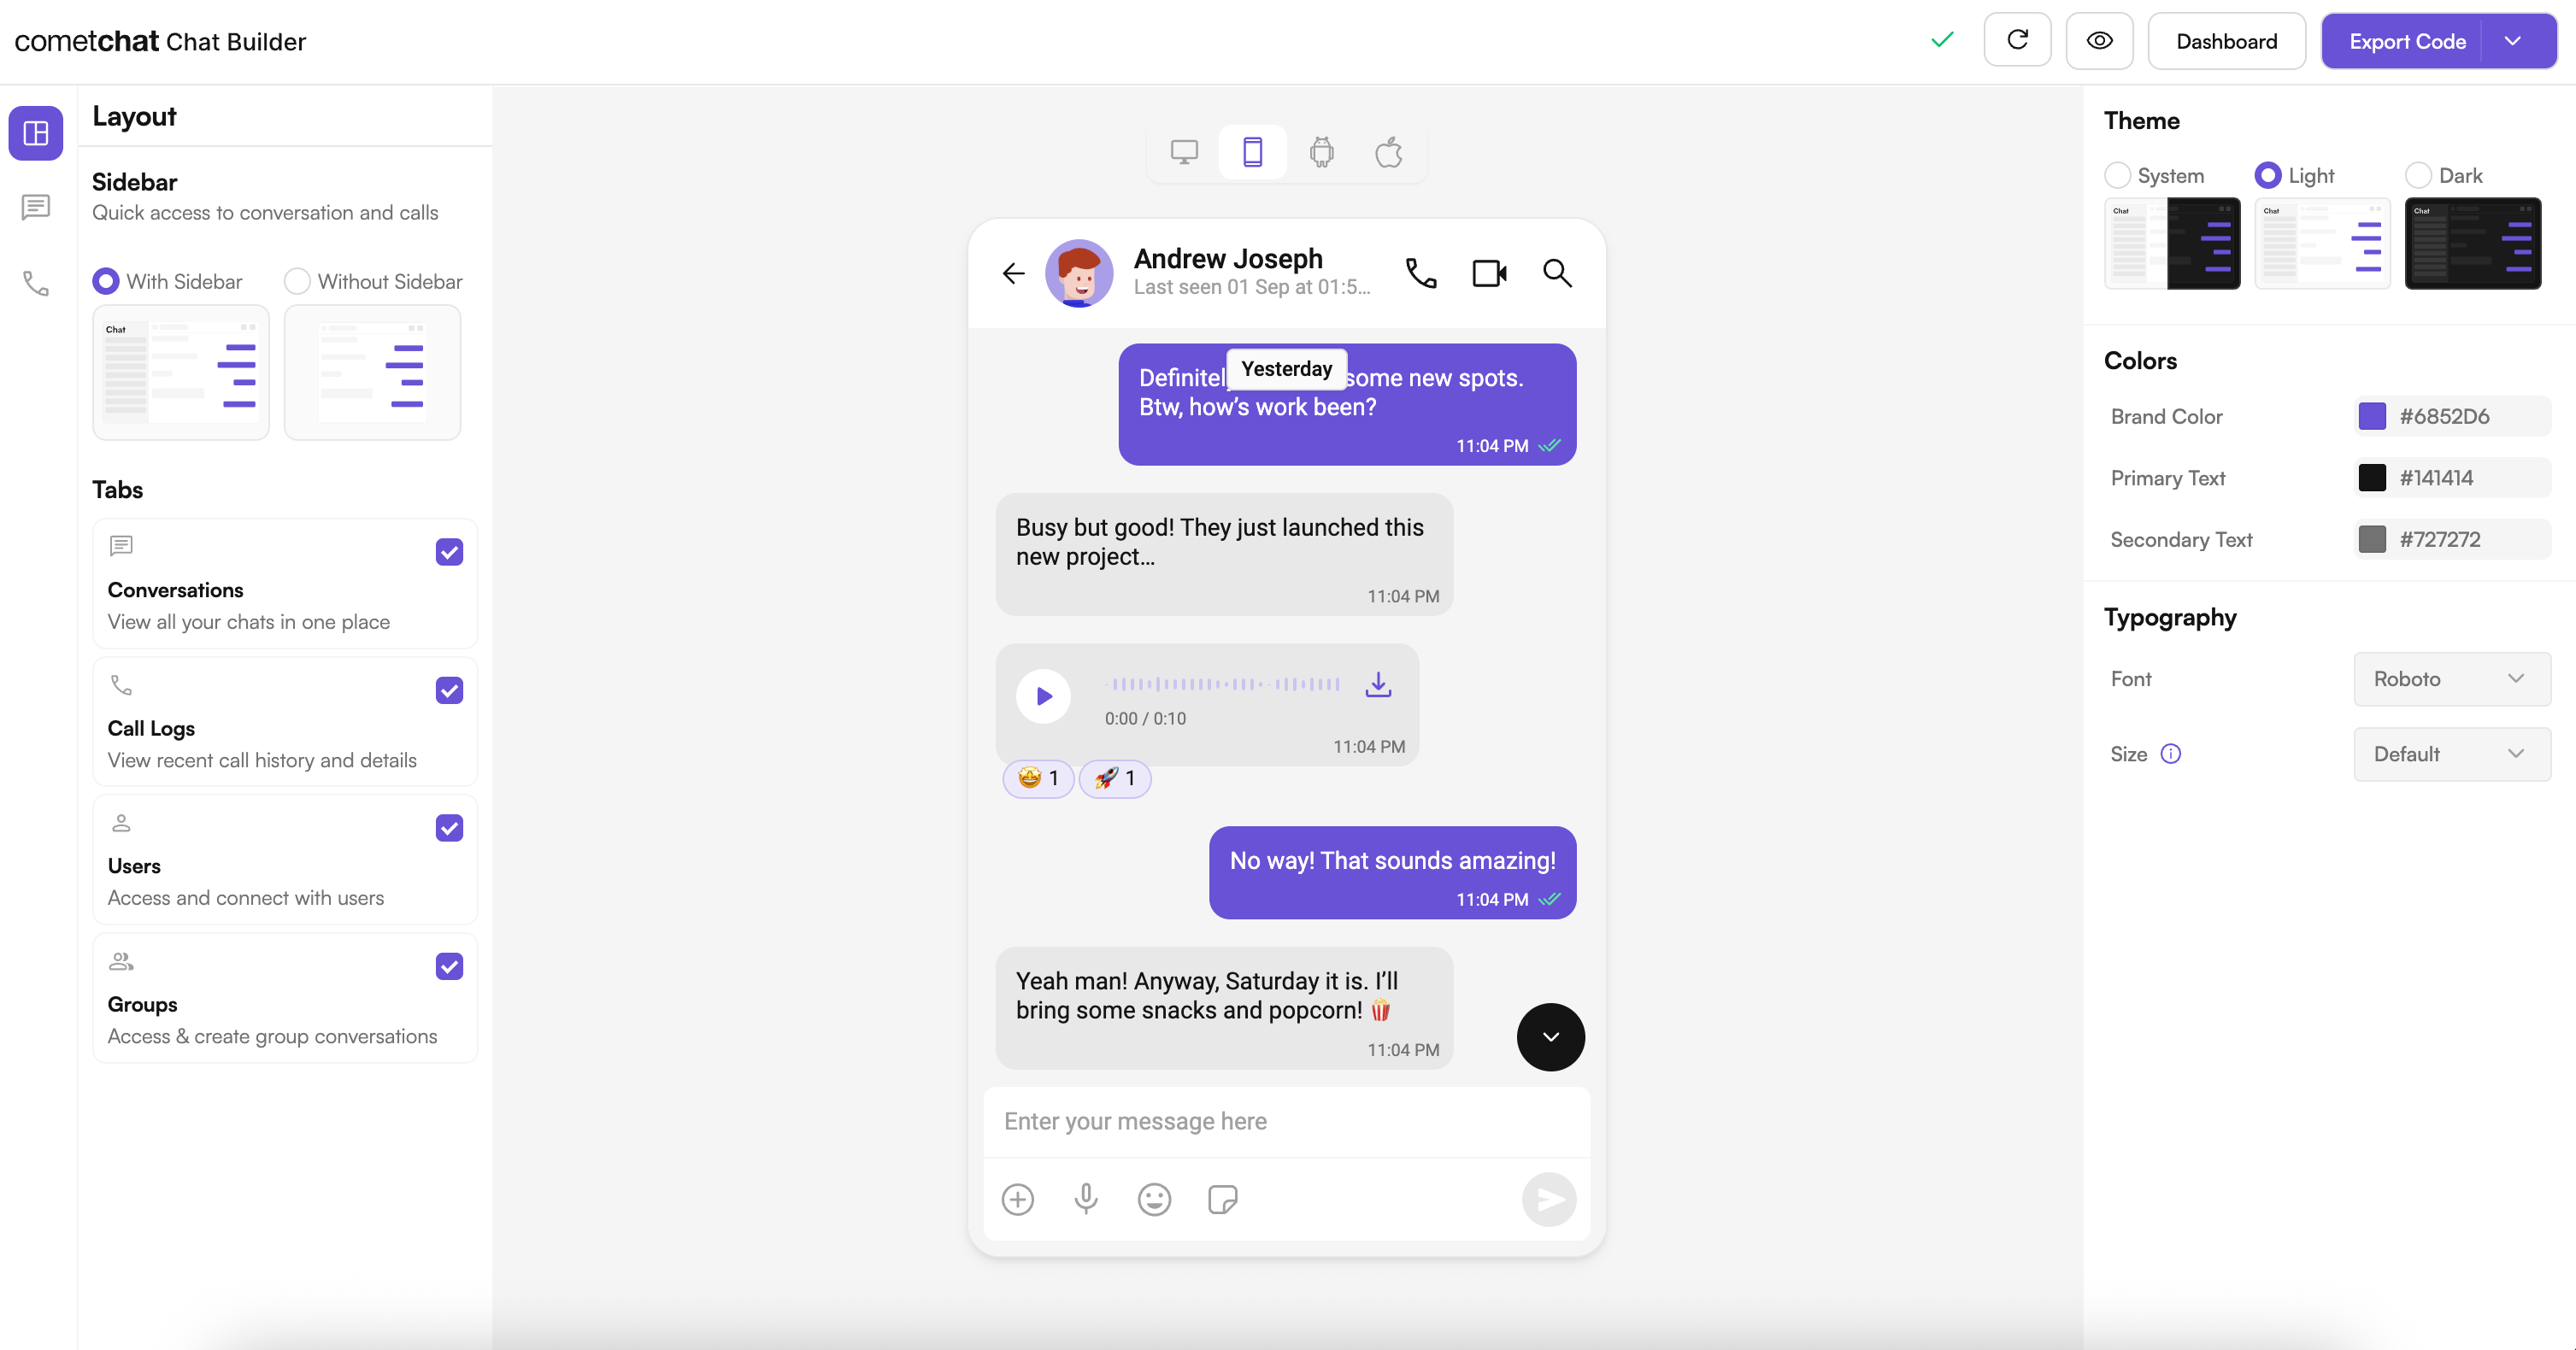
UI Kit Builder streamlines integrating CometChat's Flutter UI Kit into your cross-platform app. Design the experience visually, export platform-ready assets, and connect them to your Flutter project with just a few steps.
 ***
## Prerequisites
Before running this project, make sure you have:
* **Flutter SDK** (stable channel) with Dart 3+
* **macOS, Windows, or Linux** with Flutter tooling (Android Studio, VS Code, or IntelliJ)
* **For iOS builds**: Xcode, CocoaPods, and an iOS 13+ simulator or device
* **For Android builds**: Android Studio and an Android 5.0 (API 21)+ emulator or device
* **Internet connection** (required for CometChat services)
***
## Platform Requirements
### iOS
Update your `Podfile` and set the iOS platform to 13.0 or higher:
```ruby theme={null}
platform :ios, '13.0'
```
### Android
Change the `ndkVersion` and `minSdk` in your `android/app/build.gradle.kts`:
```kotlin theme={null}
android {
// Other Settings
ndkVersion = "27.0.12077973"
defaultConfig {
// Other Settings
minSdk = 24
}
}
```
***
## Complete Integration Workflow
1. **Design Your Chat Experience** - Use the UI Kit Builder to customize layouts, features, and styling.
2. **Review and Export** - Review which features will be enabled in your Dashboard, toggle them on/off, and download the generated code package.
3. **Preview Customizations** - Optionally, preview the chat experience before integrating it into your project.
4. **Integration** - Integrate into your existing application using the Module Import method.
5. **Customize Further** - Explore advanced customization options to tailor the chat experience.
***
## Launch the UI Kit Builder
1. Log in to your [CometChat Dashboard](https://app.cometchat.com).
2. Select your application from the list.
3. Navigate to **Integrate** → **Flutter** → **Launch UI Kit Builder**.
***
## Integration with CometChat UI Kit Builder
Follow these steps to wire the Builder output into your existing Flutter app.
### Step 1: Download the Builder Package
Download the Chat Builder app from the CometChat Dashboard. Inside you will find a `chat_builder` module, assets, and helper utilities.
### Step 2: Add the Builder Module to Your Project
Copy the `chat_builder` project directory and paste it in your app's root directory (next to your `lib`, `ios`, and `android` folders).
### Step 3: Copy Builder Assets
Copy all the contents from the assets directory of the `chat_builder` and add it to your project assets:
* **Source:** `chat_builder/assets/`
* **Destination:** `assets/`
Keep the folder structure intact so fonts, JSON files, and images resolve correctly.
### Step 4: Update `pubspec.yaml`
Point to the local Builder module and register the assets and fonts supplied by the export:
```yaml theme={null}
dependencies:
# other dependencies
chat_builder:
path: ./chat_builder
flutter:
uses-material-design: true
assets:
- assets/
- assets/sample_app/
fonts:
- family: arial
fonts:
- asset: assets/fonts/arial_regular.ttf
- asset: assets/fonts/arial_medium.ttf
- asset: assets/fonts/arial_bold.ttf
- family: inter
fonts:
- asset: assets/fonts/inter_regular.otf
- asset: assets/fonts/inter_medium.otf
- asset: assets/fonts/inter_bold.otf
- family: roboto
fonts:
- asset: assets/fonts/roboto_regular.ttf
- asset: assets/fonts/roboto_medium.ttf
- asset: assets/fonts/roboto_bold.ttf
- family: times New Roman
fonts:
- asset: assets/fonts/times_new_roman_regular.ttf
- asset: assets/fonts/times_new_roman_medium.otf
- asset: assets/fonts/times_new_roman_bold.otf
```
Ensure indentation is consistent—Flutter's asset and font declarations are whitespace sensitive.
### Step 5: Install Dependencies
Run the following commands at the root of your project:
```bash theme={null}
flutter pub get
cd ios && pod install
```
### Step 6: Initialize Builder Settings
In the main file of your project, add the following lines before `runApp()`:
```dart theme={null}
import 'package:flutter/widgets.dart';
import 'package:chat_builder/utils/builder_settings_helper.dart';
Future main() async {
WidgetsFlutterBinding.ensureInitialized();
await BuilderSettingsHelper.loadFromAsset();
runApp(const MyApp());
}
```
This ensures generated constants, themes, and resources are ready when your widgets build.
### Step 7: Authenticate Your User
The exported module uses the standard CometChat Flutter UI Kit underneath, so the SDK must be initialized and a user logged in before chat screens can load. The Builder reads your `APP_ID`, `AUTH_KEY`, and `REGION` from `chat_builder/lib/utils/app_constants.dart` (see [Directory Structure](/chat-builder/flutter/builder-dir-structure)).
You have two ways to get a logged-in user:
* **Let the Builder handle login.** `ChatBuilder.launchBuilder(context)` opens the Builder's own flow, which includes a login screen when no user is signed in (see Step 8). This is the fastest path for prototyping.
* **Authenticate from your own app.** If your app already manages users, initialize and log in with the standard UI Kit APIs before opening the chat screens directly.
For development you can log in with an Auth Key:
```dart theme={null}
CometChatUIKit.login(
"cometchat-uid-1", // Replace with a valid UID
onSuccess: (user) {
debugPrint('CometChat login success');
},
onError: (error) {
debugPrint('CometChat login error');
},
);
```
Auth Key login is intended for development only. For production, mint an Auth Token on your server and call `CometChatUIKit.loginWithAuthToken()` instead, so your Auth Key is never shipped in the client. See [Login using Auth Token](/ui-kit/flutter/methods#login-using-auth-token).
For the full initialization and login reference, see [Getting Started](/ui-kit/flutter/getting-started) and [Methods](/ui-kit/flutter/methods).
### Step 8: Launch UI Kit Builder Screens
Use the `ChatBuilder` APIs to open preconfigured experiences.
**If CometChat is not initialized or user is not logged in:**
```dart theme={null}
import 'package:chat_builder/chat_builder.dart';
ChatBuilder.launchBuilder(context);
```
**If CometChat is initialized and user is logged in:**
Open Messages screen for a User:
```dart theme={null}
ChatBuilder.launchMessages(
context: context,
user: user, // instance of CometChatUser
);
```
Open Messages screen for a Group:
```dart theme={null}
ChatBuilder.launchMessages(
context: context,
group: group, // instance of CometChatGroup
);
```
### Step 9: Refresh Settings After Updates
Whenever you export a new Builder configuration, replace the generated JSON, fonts, and assets in your project, then rerun `flutter pub get` to pick up changes.
***
## Light & Dark Theme
The Builder exports a `theme` value in `cometchat-builder-settings.json` that controls the chat UI's appearance:
| Value | Behavior |
| ---------- | --------------------------------------- |
| `'light'` | Always renders the light theme |
| `'dark'` | Always renders the dark theme |
| `'system'` | Follows the device's light/dark setting |
To switch modes, change the `theme` value in the exported settings JSON (or pick it in the Builder and re-export), then rerun `flutter pub get`. Brand and text colors for each mode are configured alongside it. See [UI Kit Builder Settings → Style](/chat-builder/flutter/builder-settings) for the full color and typography schema.
For theming beyond what the Builder exposes—custom color palettes, typography, spacing tokens, and `ThemeExtension`—use the UI Kit's theming system directly. See [Theming](/ui-kit/flutter/theme-introduction).
***
## Enable Features in CometChat Dashboard
If your app needs any of these features, enable them from your [Dashboard](https://app.cometchat.com):
* Stickers
* Polls
* Collaborative whiteboard
* Collaborative document
* Message translation
* AI User Copilot: Conversation starter, Conversation summary, Smart reply
**How to enable:**
***
## Prerequisites
Before running this project, make sure you have:
* **Flutter SDK** (stable channel) with Dart 3+
* **macOS, Windows, or Linux** with Flutter tooling (Android Studio, VS Code, or IntelliJ)
* **For iOS builds**: Xcode, CocoaPods, and an iOS 13+ simulator or device
* **For Android builds**: Android Studio and an Android 5.0 (API 21)+ emulator or device
* **Internet connection** (required for CometChat services)
***
## Platform Requirements
### iOS
Update your `Podfile` and set the iOS platform to 13.0 or higher:
```ruby theme={null}
platform :ios, '13.0'
```
### Android
Change the `ndkVersion` and `minSdk` in your `android/app/build.gradle.kts`:
```kotlin theme={null}
android {
// Other Settings
ndkVersion = "27.0.12077973"
defaultConfig {
// Other Settings
minSdk = 24
}
}
```
***
## Complete Integration Workflow
1. **Design Your Chat Experience** - Use the UI Kit Builder to customize layouts, features, and styling.
2. **Review and Export** - Review which features will be enabled in your Dashboard, toggle them on/off, and download the generated code package.
3. **Preview Customizations** - Optionally, preview the chat experience before integrating it into your project.
4. **Integration** - Integrate into your existing application using the Module Import method.
5. **Customize Further** - Explore advanced customization options to tailor the chat experience.
***
## Launch the UI Kit Builder
1. Log in to your [CometChat Dashboard](https://app.cometchat.com).
2. Select your application from the list.
3. Navigate to **Integrate** → **Flutter** → **Launch UI Kit Builder**.
***
## Integration with CometChat UI Kit Builder
Follow these steps to wire the Builder output into your existing Flutter app.
### Step 1: Download the Builder Package
Download the Chat Builder app from the CometChat Dashboard. Inside you will find a `chat_builder` module, assets, and helper utilities.
### Step 2: Add the Builder Module to Your Project
Copy the `chat_builder` project directory and paste it in your app's root directory (next to your `lib`, `ios`, and `android` folders).
### Step 3: Copy Builder Assets
Copy all the contents from the assets directory of the `chat_builder` and add it to your project assets:
* **Source:** `chat_builder/assets/`
* **Destination:** `assets/`
Keep the folder structure intact so fonts, JSON files, and images resolve correctly.
### Step 4: Update `pubspec.yaml`
Point to the local Builder module and register the assets and fonts supplied by the export:
```yaml theme={null}
dependencies:
# other dependencies
chat_builder:
path: ./chat_builder
flutter:
uses-material-design: true
assets:
- assets/
- assets/sample_app/
fonts:
- family: arial
fonts:
- asset: assets/fonts/arial_regular.ttf
- asset: assets/fonts/arial_medium.ttf
- asset: assets/fonts/arial_bold.ttf
- family: inter
fonts:
- asset: assets/fonts/inter_regular.otf
- asset: assets/fonts/inter_medium.otf
- asset: assets/fonts/inter_bold.otf
- family: roboto
fonts:
- asset: assets/fonts/roboto_regular.ttf
- asset: assets/fonts/roboto_medium.ttf
- asset: assets/fonts/roboto_bold.ttf
- family: times New Roman
fonts:
- asset: assets/fonts/times_new_roman_regular.ttf
- asset: assets/fonts/times_new_roman_medium.otf
- asset: assets/fonts/times_new_roman_bold.otf
```
Ensure indentation is consistent—Flutter's asset and font declarations are whitespace sensitive.
### Step 5: Install Dependencies
Run the following commands at the root of your project:
```bash theme={null}
flutter pub get
cd ios && pod install
```
### Step 6: Initialize Builder Settings
In the main file of your project, add the following lines before `runApp()`:
```dart theme={null}
import 'package:flutter/widgets.dart';
import 'package:chat_builder/utils/builder_settings_helper.dart';
Future main() async {
WidgetsFlutterBinding.ensureInitialized();
await BuilderSettingsHelper.loadFromAsset();
runApp(const MyApp());
}
```
This ensures generated constants, themes, and resources are ready when your widgets build.
### Step 7: Authenticate Your User
The exported module uses the standard CometChat Flutter UI Kit underneath, so the SDK must be initialized and a user logged in before chat screens can load. The Builder reads your `APP_ID`, `AUTH_KEY`, and `REGION` from `chat_builder/lib/utils/app_constants.dart` (see [Directory Structure](/chat-builder/flutter/builder-dir-structure)).
You have two ways to get a logged-in user:
* **Let the Builder handle login.** `ChatBuilder.launchBuilder(context)` opens the Builder's own flow, which includes a login screen when no user is signed in (see Step 8). This is the fastest path for prototyping.
* **Authenticate from your own app.** If your app already manages users, initialize and log in with the standard UI Kit APIs before opening the chat screens directly.
For development you can log in with an Auth Key:
```dart theme={null}
CometChatUIKit.login(
"cometchat-uid-1", // Replace with a valid UID
onSuccess: (user) {
debugPrint('CometChat login success');
},
onError: (error) {
debugPrint('CometChat login error');
},
);
```
Auth Key login is intended for development only. For production, mint an Auth Token on your server and call `CometChatUIKit.loginWithAuthToken()` instead, so your Auth Key is never shipped in the client. See [Login using Auth Token](/ui-kit/flutter/methods#login-using-auth-token).
For the full initialization and login reference, see [Getting Started](/ui-kit/flutter/getting-started) and [Methods](/ui-kit/flutter/methods).
### Step 8: Launch UI Kit Builder Screens
Use the `ChatBuilder` APIs to open preconfigured experiences.
**If CometChat is not initialized or user is not logged in:**
```dart theme={null}
import 'package:chat_builder/chat_builder.dart';
ChatBuilder.launchBuilder(context);
```
**If CometChat is initialized and user is logged in:**
Open Messages screen for a User:
```dart theme={null}
ChatBuilder.launchMessages(
context: context,
user: user, // instance of CometChatUser
);
```
Open Messages screen for a Group:
```dart theme={null}
ChatBuilder.launchMessages(
context: context,
group: group, // instance of CometChatGroup
);
```
### Step 9: Refresh Settings After Updates
Whenever you export a new Builder configuration, replace the generated JSON, fonts, and assets in your project, then rerun `flutter pub get` to pick up changes.
***
## Light & Dark Theme
The Builder exports a `theme` value in `cometchat-builder-settings.json` that controls the chat UI's appearance:
| Value | Behavior |
| ---------- | --------------------------------------- |
| `'light'` | Always renders the light theme |
| `'dark'` | Always renders the dark theme |
| `'system'` | Follows the device's light/dark setting |
To switch modes, change the `theme` value in the exported settings JSON (or pick it in the Builder and re-export), then rerun `flutter pub get`. Brand and text colors for each mode are configured alongside it. See [UI Kit Builder Settings → Style](/chat-builder/flutter/builder-settings) for the full color and typography schema.
For theming beyond what the Builder exposes—custom color palettes, typography, spacing tokens, and `ThemeExtension`—use the UI Kit's theming system directly. See [Theming](/ui-kit/flutter/theme-introduction).
***
## Enable Features in CometChat Dashboard
If your app needs any of these features, enable them from your [Dashboard](https://app.cometchat.com):
* Stickers
* Polls
* Collaborative whiteboard
* Collaborative document
* Message translation
* AI User Copilot: Conversation starter, Conversation summary, Smart reply
**How to enable:**
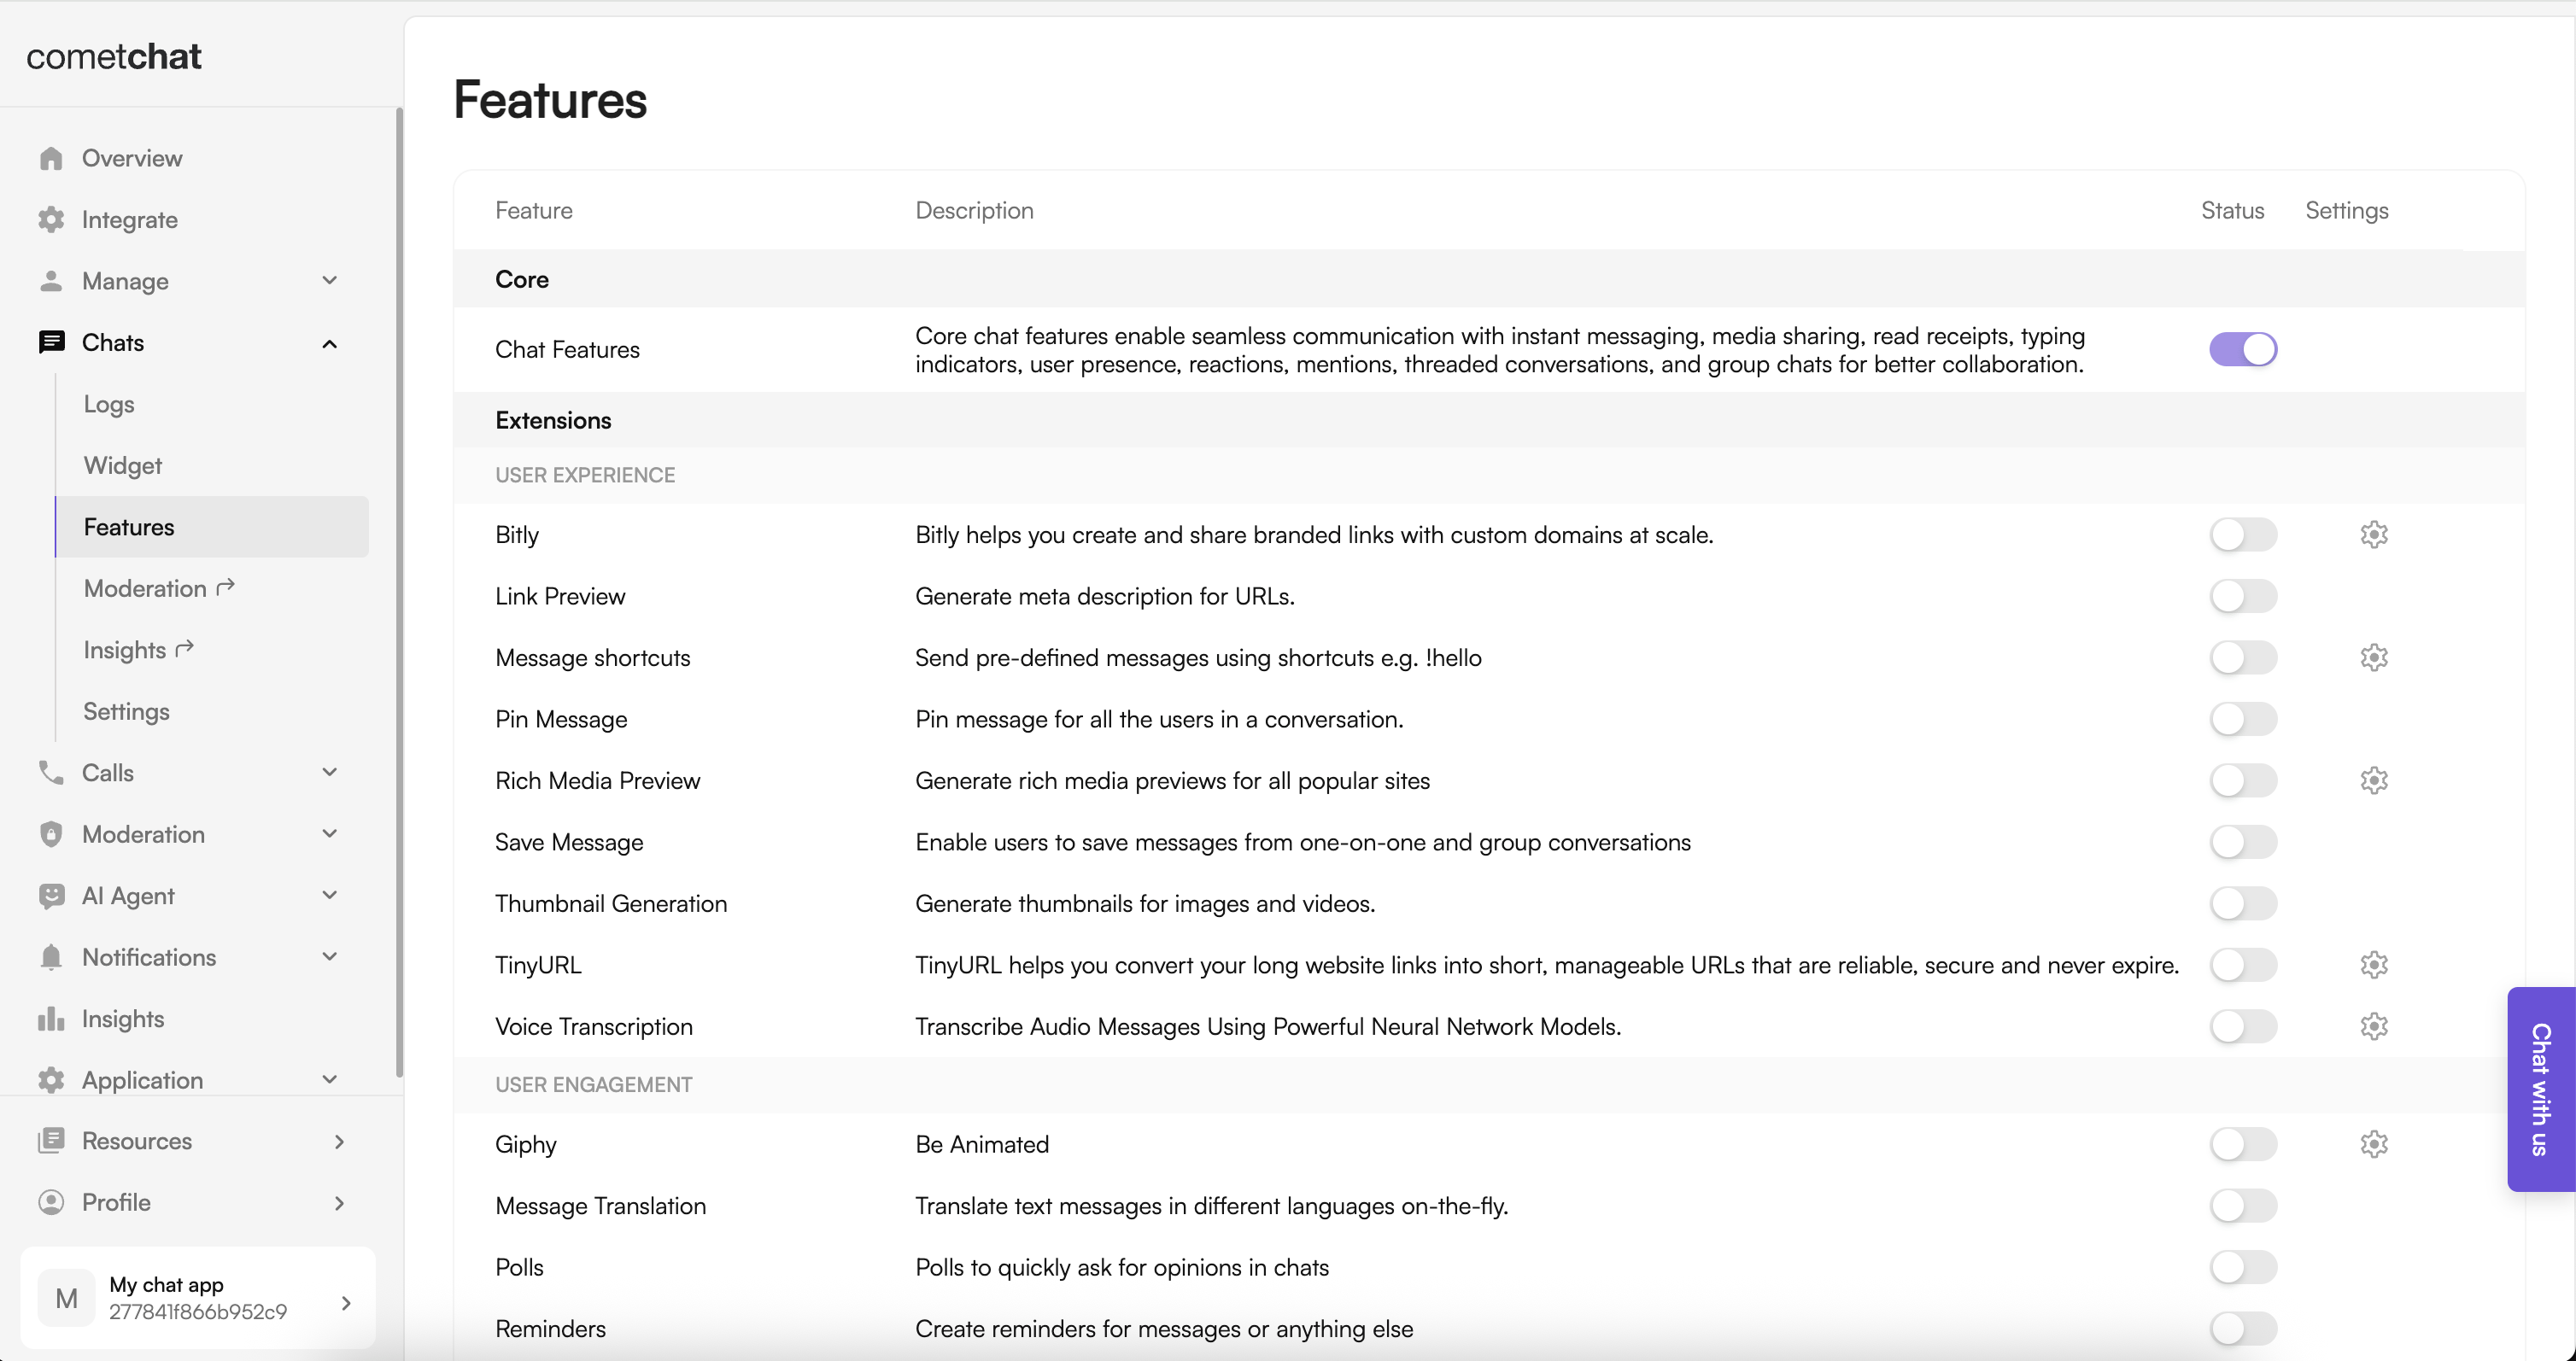 1. Log in to the Dashboard.
2. Select your app.
3. Navigate to **Chat → Features**.
4. Toggle ON the required features and Save.
***
## Important Guidelines for Changes
**Functional Changes:**
For enabling or disabling features and adjusting configurations, update the `BuilderSettingsHelper` or modify the configuration JSON. This controls all feature flags and configuration constants.
**UI and Theme-related Changes:**
For any updates related to UI, such as colors, fonts, and styles, modify the theme configuration in the Builder or update the `pubspec.yaml` font definitions.
***
## Troubleshooting
### Builder Package Not Found
* Confirm the `chat_builder` directory path in `pubspec.yaml` is correct
* Ensure the module is at the root level of your project
### Assets Missing at Runtime
* Verify the asset paths in `pubspec.yaml`
* Rerun `flutter pub get` after any changes
### iOS Build Issues
* Make sure you ran `pod install` inside the `ios` directory after adding the new dependency
* Check that the iOS platform version in `Podfile` is 13.0 or higher
### Undefined Symbols
* Reimport or regenerate the `BuilderSettingsHelper` if package paths changed
* Clean and rebuild: `flutter clean && flutter pub get`
***
## Next Steps
Understand the settings file and feature toggles.
Adjust component props, behavior, and UI elements.
See how the exported code is organized.
Customize colors, typography, and styling to match your brand.
Customize message bubble content, headers, footers, and status views.
Replace specific regions of a component's UI with your own views.
1. Log in to the Dashboard.
2. Select your app.
3. Navigate to **Chat → Features**.
4. Toggle ON the required features and Save.
***
## Important Guidelines for Changes
**Functional Changes:**
For enabling or disabling features and adjusting configurations, update the `BuilderSettingsHelper` or modify the configuration JSON. This controls all feature flags and configuration constants.
**UI and Theme-related Changes:**
For any updates related to UI, such as colors, fonts, and styles, modify the theme configuration in the Builder or update the `pubspec.yaml` font definitions.
***
## Troubleshooting
### Builder Package Not Found
* Confirm the `chat_builder` directory path in `pubspec.yaml` is correct
* Ensure the module is at the root level of your project
### Assets Missing at Runtime
* Verify the asset paths in `pubspec.yaml`
* Rerun `flutter pub get` after any changes
### iOS Build Issues
* Make sure you ran `pod install` inside the `ios` directory after adding the new dependency
* Check that the iOS platform version in `Podfile` is 13.0 or higher
### Undefined Symbols
* Reimport or regenerate the `BuilderSettingsHelper` if package paths changed
* Clean and rebuild: `flutter clean && flutter pub get`
***
## Next Steps
Understand the settings file and feature toggles.
Adjust component props, behavior, and UI elements.
See how the exported code is organized.
Customize colors, typography, and styling to match your brand.
Customize message bubble content, headers, footers, and status views.
Replace specific regions of a component's UI with your own views.